Automatic Deployment of A Vue Application on GitHub Pages for Free
A step-by-step guide to automatically deploying a Vue application on GitHub Pages for free using GitHub Actions for continuous deployment.

Automatic Deployment of A Vue Application on GitHub Pages for Free
When it comes to learning a new topic or showcasing your skills, creating a small application as a proof of concept can be a great way to get started. Deploying this application on GitHub Pages can be a convenient and cost-effective way to share your work. You can host static websites and web apps directly from your Github repository, making managing your code and collaborating with other developers a breeze.
However, manually deploying your application on GitHub Pages can be time-consuming and error-prone. In this article, we’ll explore how to automate the deployment process using GitHub Actions. We’ll go through the step-by-step process of setting up a workflow that builds and deploys your application to Github Pages whenever you push changes to your repository.
The Application
Any static website or Single Page Application will do. If you don’t have one in hand, you can quickly scaffold a new project using the vue-cli using the command:
vue create vue-deployIn case you don’t have the
vue-cliinstalled runnpm install -g @vue/clifirst
By default the vue-cli will initialise a new git project for us.
To complete the deployment, we need to perform the following 4 steps:
- Create a GitHub Action workflow
- Set the public path
- Publish the project
- Give GitHub Actions permission to deploy to GitHub Pages
1. Create a GitHub Action Workflow
This is the most complex step which will do all the heavy lifting of building and publishing our application to GitHub pages. GitHub actions are an established and extremely powerful tool. The following workflow should work out of the box for your project, but If you want to extend it feel free to dive into the documentation.
name: Deploy to GH Pages

on:
  push:
    branches:
      \- main

jobs:
  build-deploy:
    runs-on: ubuntu-latest

    steps:
      \- name: Checkout 🛎️
        uses: actions/checkout@master
        with:
          persist-credentials: false

      \- name: Install 🔧
        run: yarn install

      \- name: Build 🏗️
        run: yarn build
        env:
          NODE\_ENV: production

      \- name: Deploy to GH Pages 🚀
        if: ${{ github.event\_name != 'pull\_request' }}
        uses: peaceiris/actions-gh-pages@v3
        with:
          github\_token: ${{ secrets.GITHUB\_TOKEN }}
          publish\_dir: dist
This file named deploy.yml should be placed inside the folder .github/workflows/ In a new vue-cli project, you will have to create those folders yourself.
2. Set the Public Path
The publicPath of your application needs to be defined in the file vue.config.js since the application will be deployed to a subpath of your GitHub subdomain.
The final version of the vue.config.js will look like this
(Only the publicPath option was added)
const { defineConfig } = require('@vue/cli-service')
module.exports = defineConfig({
  transpileDependencies: true,
  publicPath: process.env.NODE\_ENV === "production" ? "/vue-deploy/" : "/",
})
3. Publish the Project
This can be done easily from VSCode or GitHub desktop. If you prefer using the terminal, the commands are:
\# Sets the new remote
$ git remote add origin <REMOTE\_URL>

\# Pushes the changes in your local repository up to the remote repository you specified as the origin
$ git push -u origin main
4. Give Permissions
If you visit the published repository, you will notice in the Actions tab that the workflow was triggered but failed.
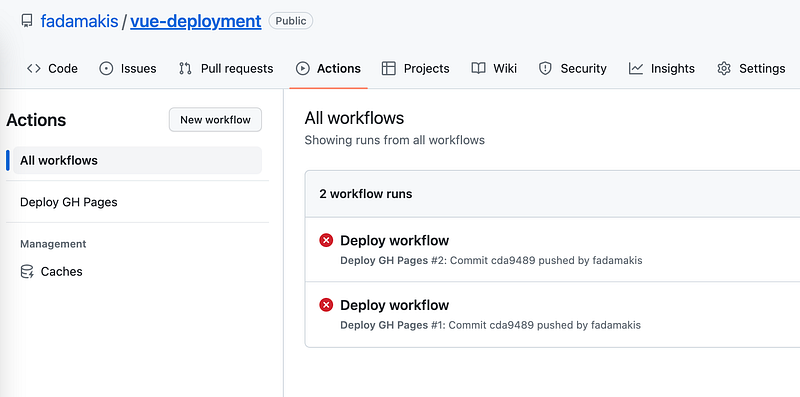
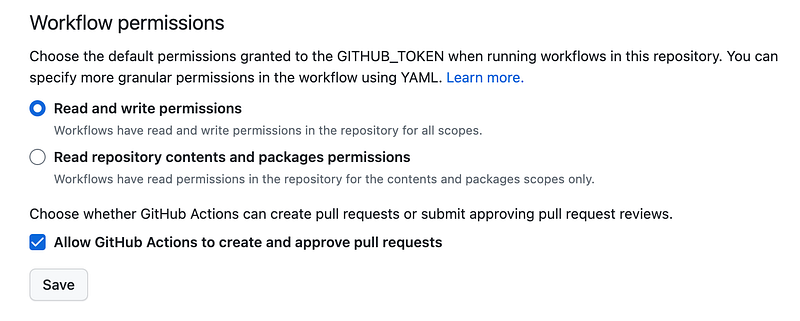
We need to update the project setting as follows.
Go to Settings > Actions > General and at the bottom, change the Workflow permissions to Read and Write and enable GitHub Actions to create and approve pull requests.
After a new push event or by manually re-running the workflow, the application will be deployed under your GitHub domain using the publicPath specified in the vue config file in step 2. For example, fadamakis/vue-deploy is available in fadamakis.github.io/vue-deploy/
Go build something amazing! 🚀